A common cheap mistake that makes you look tired on camera is using harsh, uneven lighting or placement that casts unflattering shadows and washes out your features. Overly bright or dim lights, poor diffusion, and incorrect angles can emphasize wrinkles and dull your skin tone. To avoid this, use soft, balanced lighting, position your lights at flattering angles, and experiment with DIY hacks like bounce boards. Keep exploring to discover simple tips for professional-looking results.
Key Takeaways
- Using harsh, undiffused lighting creates unflattering shadows that emphasize wrinkles and tired eyes.
- Bright, direct lights without diffusion wash out skin tones, making you appear dull and fatigued.
- Unbalanced lighting with uneven placement results in flat, unflattering look and highlights imperfections.
- Failing to soften or bounce light causes sharp shadows and unnatural skin tones that age your appearance.
- Overly bright or poorly calibrated lights can overexpose your face, making you look exhausted and less vibrant.

Skytex Softbox Lighting Kit(2Pack), 20x28in Soft Box | 85W 2700-6400K E27 LED Bulb Continuous Photography Lighting, Photo Studio Lights Equipment for Camera Shooting, Video Recording
The kit included: 2pcs 20" x 28"/50cm x 70cm Softbox +2pcs 85W 2700-6400K 100V-240V LED Light Bulb +…
As an affiliate, we earn on qualifying purchases.
As an affiliate, we earn on qualifying purchases.
Why Is Good Lighting Essential for Professional Videos?
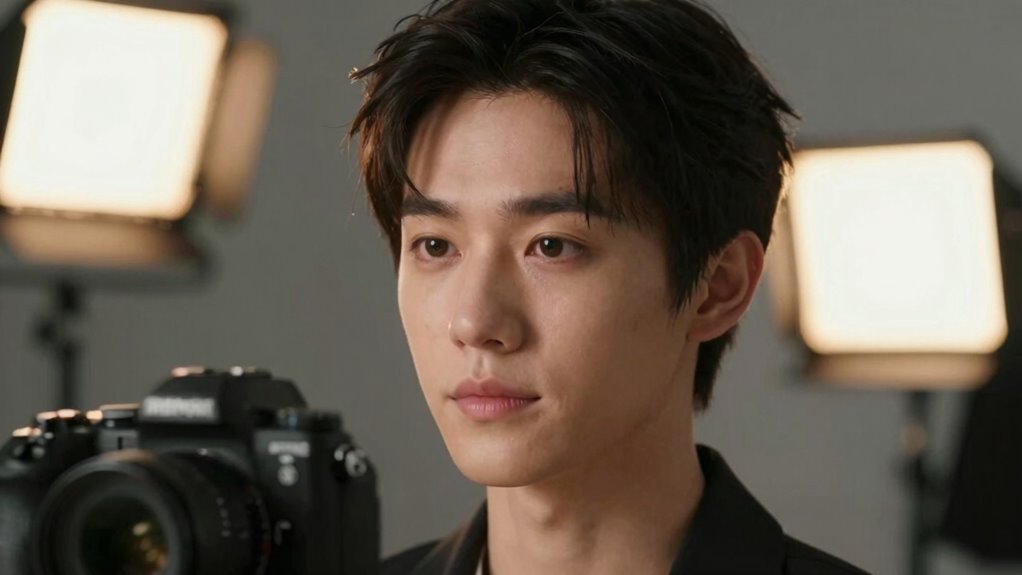
Good lighting is essential for professional videos because it directly impacts the visual quality and clarity of your footage. When you prioritize lighting aesthetics, your videos instantly look more polished and engaging. Creative lighting allows you to set the mood, emphasize subjects, and add depth to your shots, making them stand out. Poor lighting can make even the best content appear dull or unprofessional, distracting viewers from your message. On the other hand, well-designed lighting enhances details, smooths skin tones, and creates a sense of realism or artistry. Additionally, understanding how to calibrate your lighting setup ensures consistent and optimal results across different shooting conditions. Proper lighting techniques are fundamental in mastering the art of bug out bags, as they help you prepare for unpredictable scenarios by understanding essential tools and their optimal use. Mastering lighting calibration also enables you to adapt quickly to different environments, ensuring your footage remains high-quality regardless of external factors. By understanding how to manipulate lighting creatively, you gain control over your video’s overall feel. This mastery not only improves clarity but also elevates your production value, helping your videos look more professional and visually appealing. Moreover, incorporating advanced lighting techniques can further refine your visual storytelling and make your videos stand out in a crowded digital space, especially when combined with smart home lighting solutions that can be integrated for automated and consistent results.

UBeesize 12'' LED Ring Light with 62'' Tripod Stand, Selfie Ring Light for Video Recording, Live Streaming, TikTok & YouTube, Compatible with iPhone & Android (Black)
【12” Powerful LED Ring Light with 240 LEDs】This upgraded 12-inch ring light features 240 high-efficiency LEDs delivering 10W…
As an affiliate, we earn on qualifying purchases.
As an affiliate, we earn on qualifying purchases.
Should You Use Natural or Artificial Light for Your Videos?
Have you ever wondered whether natural or artificial light is better for your videos? Natural light provides a soft, even glow that can make your footage look warm and inviting, especially if you shoot during golden hour. It’s free and easy to use, but it’s also unpredictable—changing with weather, time of day, and seasons. Artificial light, on the other hand, gives you control. You can set it up consistently and adjust its brightness and color temperature to match your mood or environment. This makes it ideal for indoor shooting or situations where natural light isn’t available. Ultimately, your choice depends on your setting, budget, and the look you want. Many creators use a combination of both to achieve the best results. Understanding lighting control can help you optimize your setup for professional-looking videos. Additionally, being aware of lighting quality can significantly impact how tired or vibrant you appear on camera, so investing in good lighting equipment can make a noticeable difference. Improving your lighting setup with proper accessories, like diffusers or reflectors, can further enhance your video quality. Paying attention to lighting consistency ensures your footage remains seamless and visually appealing throughout your shoot.
Camera Flash Diffuser,Eliminate Harsh Light and Shadow,Foldable with Storage Bag Easy Install Flash Diffuser Camera Accessories
Small size, easy carrying, can be folded in the storage bag included.
As an affiliate, we earn on qualifying purchases.
As an affiliate, we earn on qualifying purchases.
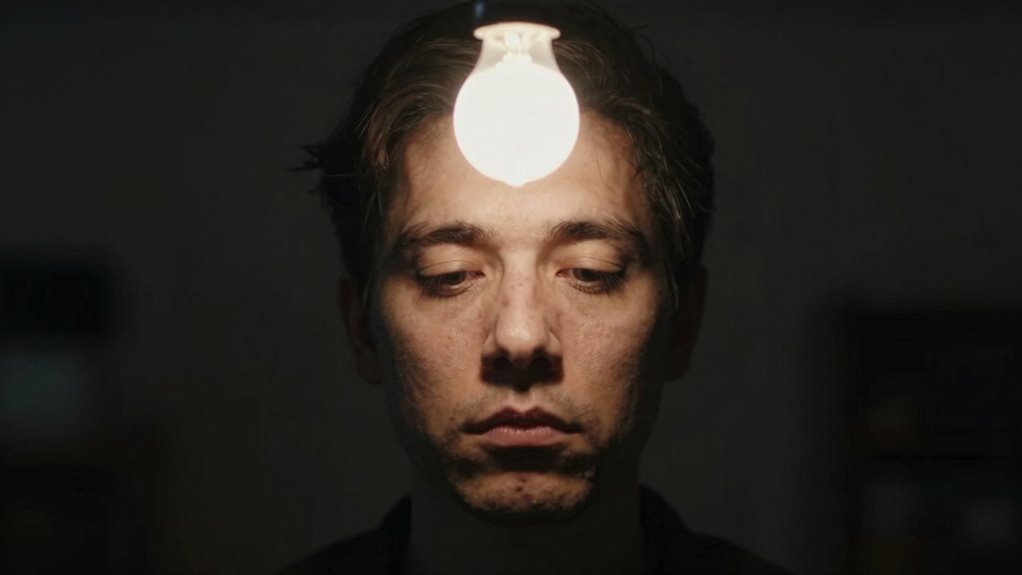
What Are Common Cheap Lighting Mistakes That Make You Look Tired?
One common mistake is using harsh or uneven lighting, which can cast unflattering shadows and make you look tired. Bright lights that are too strong or dim settings that don’t provide enough illumination can also wash out your face or create dullness. These cheap lighting errors can considerably impact how fresh or fatigued you appear on camera. Additionally, neglecting to use Free Floating lighting techniques can result in a flat or unbalanced appearance, further emphasizing tiredness. Ensuring your lighting setup incorporates lighting balance can help you achieve a more natural and vibrant look. Recognizing the importance of lighting quality can help you avoid these pitfalls and improve your overall appearance on camera. Paying attention to lighting setup details, like placement and diffusion, can dramatically enhance your on-camera presence. Properly calibrating your lights is also crucial for maintaining consistent and flattering illumination.
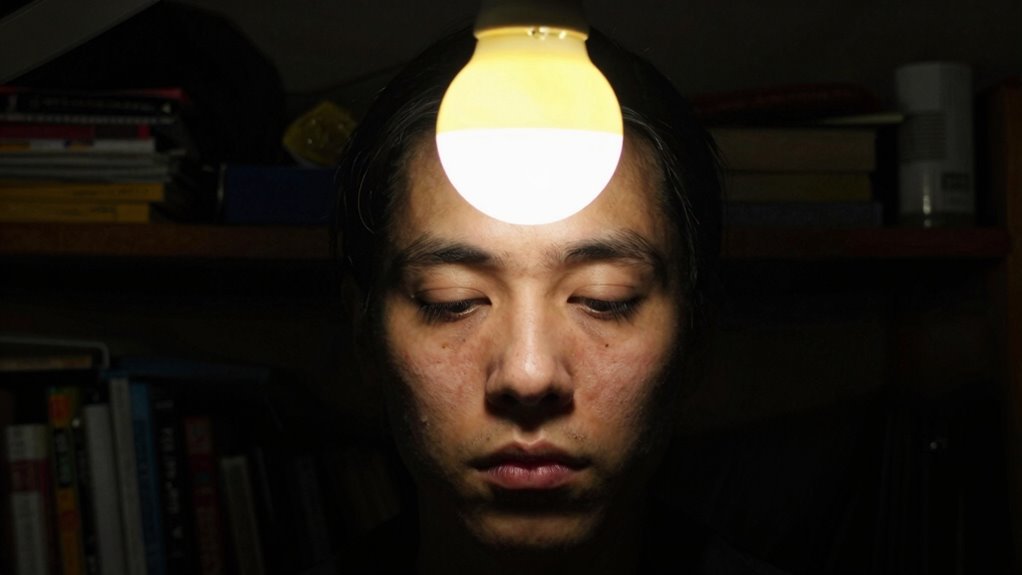
Harsh, Uneven Lighting
Harsh, uneven lighting can instantly make you look tired and unflattering on camera. When your light source creates sharp shadows, it emphasizes wrinkles and imperfections, making your face appear tired. This often results from cheap lighting setups with direct, undiffused light. To avoid this, aim for soft shadows by diffusing your light, which creates a more even and flattering look. Additionally, uneven lighting can disrupt your color balance, causing your skin tone to look unnatural or dull. Properly balancing your lights ensures consistent, natural colors across your face. Steer clear of harsh, direct lights, and opt for diffusers or bounce techniques to create a gentle, even glow. This simple change can dramatically improve your appearance and make you look more vibrant and rested on camera. Understanding the basic principles of small systems involved in lighting setup can help you troubleshoot and improve your results more effectively.
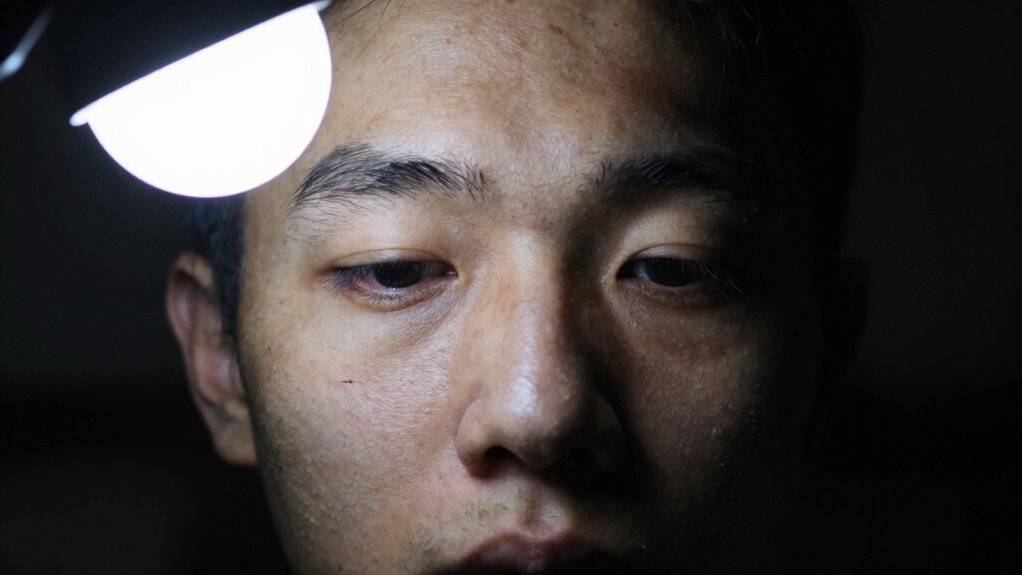
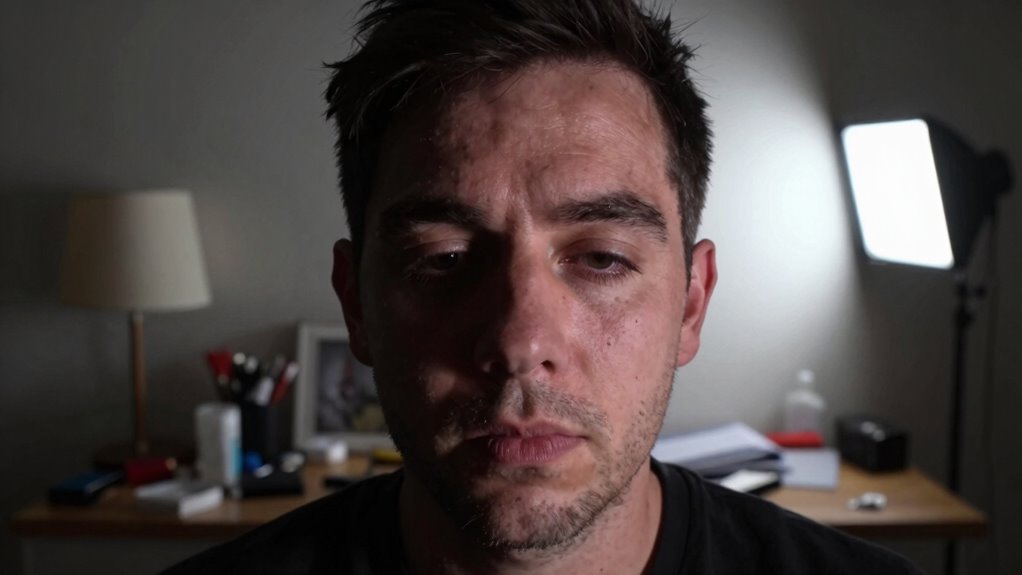
Overly Bright or Dim
When your lighting is too bright or too dim, it can make you look tired and washed out on camera. Overly bright lighting can cause lens flare, creating glare that distracts viewers and washes out your features. Dim lighting, on the other hand, leaves you in shadows, making your face appear dull and unflattering. Both issues can hinder proper color grading, which relies on consistent lighting to enhance skin tones and overall image quality. To avoid this mistake, aim for balanced lighting that evenly illuminates your face without extremes. Use diffusers or adjustable lights to control brightness, ensuring your face remains clear and vibrant. Proper lighting helps you look fresh and engaged, preventing the tired appearance caused by poor brightness levels. Additionally, understanding the importance of lighting quality can help you achieve more professional-looking videos.

Meking 17" x 12"/43 x 30cm Light Reflector Photography Cardboard, 3-in-1 Studio Foldable Light Diffuser Board for Still Life Product and Food Photo Shooting – Gold, Black, White
3 Color in One Light Reflector: White, black and gold surface, both front and back can be used,…
As an affiliate, we earn on qualifying purchases.
As an affiliate, we earn on qualifying purchases.
How Do You Choose Affordable Lighting Equipment That Works?
Finding affordable lighting equipment that actually works doesn’t have to be intimidating. Focus on understanding lighting basics like brightness, color temperature, and control. Look for options that fit your budget but still deliver quality light. Consider LED lights—they’re energy-efficient, affordable, and versatile. Check reviews to guarantee reliability and ease of use. Here’s a quick guide:
| Feature | Affordable Options | Tips |
|---|---|---|
| Brightness | Adjustable LED panels | Look for dimmable lights |
| Color Temperature | Budget-friendly softboxes | Choose adjustable temps |
| Ease of Use | Clamp lights or ring lights | Ensure simple setup |
Additionally, exploring affordable magnifying lamps can help you achieve precise lighting control for close-up shots and detailed work. Understanding lighting fundamentals can help you make informed choices that improve your video quality without overspending. Paying attention to light positioning can also significantly enhance your shot quality and reduce the appearance of tiredness in your videos. Stick to these ideas, and you’ll find lighting that enhances your videos without breaking the bank.
Where Should You Place Your Lights to Flatter Your Face?

To flatter your face on camera, position your main light slightly above eye level to create natural shadows and highlight your features. Use a fill light thoughtfully to soften harsh shadows without washing out your face. Adjusting these placements guarantees your lighting looks professional and enhances your appearance. Remember, proper lighting techniques are essential for achieving a clear, polished video appearance.
Position Lights Slightly Above
Positioning your lights slightly above eye level is one of the most effective ways to flatter your face on camera. This lighting angle creates natural shadows that define your features and minimizes unflattering lines. When you adjust your light positioning, aim the lights downward at about a 45-degree angle, directing the light toward your face. This setup reduces harsh shadows under your chin and around your nose, giving you a more balanced and youthful appearance. Proper light positioning also prevents unflattering shadows from falling in unwanted areas. Keep in mind, the slight elevation helps mimic natural light coming from above, which our eyes are accustomed to seeing. Overall, this simple adjustment enhances your look and makes your on-camera presence more appealing.
Use Fill Light Strategically
While placing your main lights slightly above eye level creates flattering shadows, adding fill lights helps soften any remaining harshness and balance your overall look. A fill light reduces shadows cast by your key light, preventing your face from appearing too harsh or tired. Position the fill light at a lower angle and closer to your face, opposite your key light, to evenly illuminate shadows without overpowering your main illumination. Keep the fill light softer and less intense than the key light to maintain natural contrast. Using a reflector or bounce board can also serve as an effective fill. Strategically placing your fill light ensures your face looks smooth and well-lit, avoiding the tired or gaunt appearance caused by harsh shadows. Proper light placement is essential for achieving home‑style lighting, which enhances your overall appearance on camera. Additionally, understanding light placement techniques can make a significant difference in achieving a professional and flattering look. Incorporating lighting consistency helps maintain a balanced and polished appearance throughout your videos.
How Can You Use DIY Hacks to Improve Your Lighting Setup?
If you’re looking to elevate your video lighting without breaking the bank, DIY hacks can be surprisingly effective. You can create creative solutions using everyday items, like placing a white bedsheet behind your light source to diffuse harsh shadows or using aluminum foil to reflect and bounce light onto your face. Stretching a sheer curtain in front of a window can soften natural light, making it more flattering. Using inexpensive desk lamps with adjustable heads allows you to direct light precisely where you need it. For even more control, craft a makeshift softbox with a cardboard box lined with foil and covered with a white cloth. These DIY hacks are simple, affordable ways to improve your lighting setup and avoid looking tired on camera.
How Does Color Temperature and Brightness Affect How You Look on Camera?
Adjusting your lighting setup can make a big difference in how you look on camera. Color temperature and brightness play key roles in achieving color consistency, which guarantees your skin looks natural and your background matches seamlessly. If your lights are too warm or too cool, your face can appear unnatural or washed out, affecting how viewers perceive you. Brightness influences how vibrant or tired you look; too much light can cause overexposure, while too little can make you appear dull. Properly balancing these factors helps create the right mood for your video—whether professional, relaxed, or energetic. When you get this right, your audience focuses on your message, not on distracting lighting errors. Good lighting enhances your presence and makes your content more engaging.
What Budget Tips Can Help You Avoid Shadows and Overexposure?

Looking for budget-friendly ways to prevent shadows and overexposure in your videos? Focus on simple lighting angles and shadow control techniques. First, position your light source slightly above and in front of you to minimize shadows on your face. Second, use household items like white sheets or foam boards as bounce reflectors to diffuse harsh light and reduce overexposure. Third, experiment with different angles—avoid placing lights directly behind or too close to your subject—to achieve even lighting. Additionally, keep the light distance manageable to prevent bright spots. By adjusting your lighting angles and incorporating basic shadow control tools, you can considerably improve your video quality without breaking the bank. Small tweaks make a big difference in achieving professional-looking results.
What Are Quick Fixes for Better Video Lighting Troubleshooting?
When your video lighting isn’t cooperating, quick fixes can make a noticeable difference right away. First, adjust your camera angles to minimize harsh shadows and overexposure—sometimes, a slight tilt or repositioning can improve the overall look. Use simple lighting accessories like reflectors or bounce boards to soften light and fill in dark spots. If you notice harsh shadows, adding a diffuser or moving your light source further away can help create a more even glow. Small tweaks, like repositioning your light or adjusting the intensity, can dramatically improve your footage. Remember, quick fixes aren’t permanent solutions, but they’re effective for troubleshooting and getting better results immediately. Experimenting with these simple adjustments can save you time and help you achieve a more professional appearance.
Frequently Asked Questions
How Does Lighting Influence the Viewer’s Perception of Your Professionalism?
Lighting greatly influences how viewers perceive your professionalism by shaping their engagement and understanding. Good lighting, rooted in lighting psychology, highlights your credibility and attention to detail, making you appear more competent. Poor lighting, on the other hand, can make you seem tired or unprepared. When you use proper lighting, you boost viewer engagement, reinforcing a polished, professional image that encourages trust and connection.
Can Smartphone Lights Be Effective for Quality Video Lighting?
Imagine your face bathed in the soft glow of smartphone LEDs—yes, they can be surprisingly effective for affordable lighting. These tiny lights cast a warm, even hue that brightens your features without harsh shadows, making your video look more professional. While they may not replace professional setups, smartphone LEDs are a practical, accessible option that can substantially improve your video quality on a budget.
What Are the Signs of Poor Lighting That Negatively Impact Your Video Quality?
You notice poor lighting when shadows obscure your face and the background looks shadowy or unevenly lit. Uneven illumination creates harsh patches or dark spots, making your video appear unprofessional. If your face is poorly lit or the background distracts with inconsistent brightness, it’s a sign your lighting setup isn’t working well. These issues make you look tired and reduce overall clarity, so improving your lighting can instantly boost your video quality.
How Can I Test My Lighting Setup Before Recording?
To test your lighting setup, turn on your lights and step in front of the camera. Check if your face is evenly lit without harsh shadows—if shadows hide your best features, adjust the light placement. Use a mirror or record a quick clip to see how shadows fall and if the lighting looks natural. Remember, good shadow control and proper light placement make you look energized, not exhausted.
What Common Mistakes Do Beginners Make When Adjusting Light Intensity?
You often make the mistake of not adjusting the light intensity properly. It’s easy to overlook how brightness control impacts your look, leading to overly harsh or dull lighting. To avoid this, experiment with your brightness settings until you achieve a natural, even glow. Keep your light intensity subtle and balanced, so you don’t appear tired or washed out. Small tweaks can markedly improve your video’s overall quality.
Conclusion
Great lighting can make or break your videos, helping you look energetic and professional. By avoiding common cheap mistakes and using smart, budget-friendly tips, you can dramatically improve your setup. Remember, isn’t your content worth investing a little effort into perfect lighting? With the right choices and a few DIY tricks, you’ll look vibrant and confident on camera—without breaking the bank. So, why settle for tired-looking videos when better lighting is just a few tweaks away?