TL;DR
Effective closet studio setups depend more on surface treatment and placement than on foam. Moving the rig out of the room or carefully sealing gaps makes a huge difference in sound quality and noise control.
Ever tried recording in a tiny closet? It can sound surprisingly good—if you know how to tame the reflections and manage noise. Most people think foam is the magic answer, but the real secret lies in where you put things and how you treat surfaces.
This guide is about making your closet work for sound, not just hiding gear. You’ll learn how to dampen echoes, position your mic for the best tone, and even turn that closet into a quiet, professional studio space — without spending a fortune.
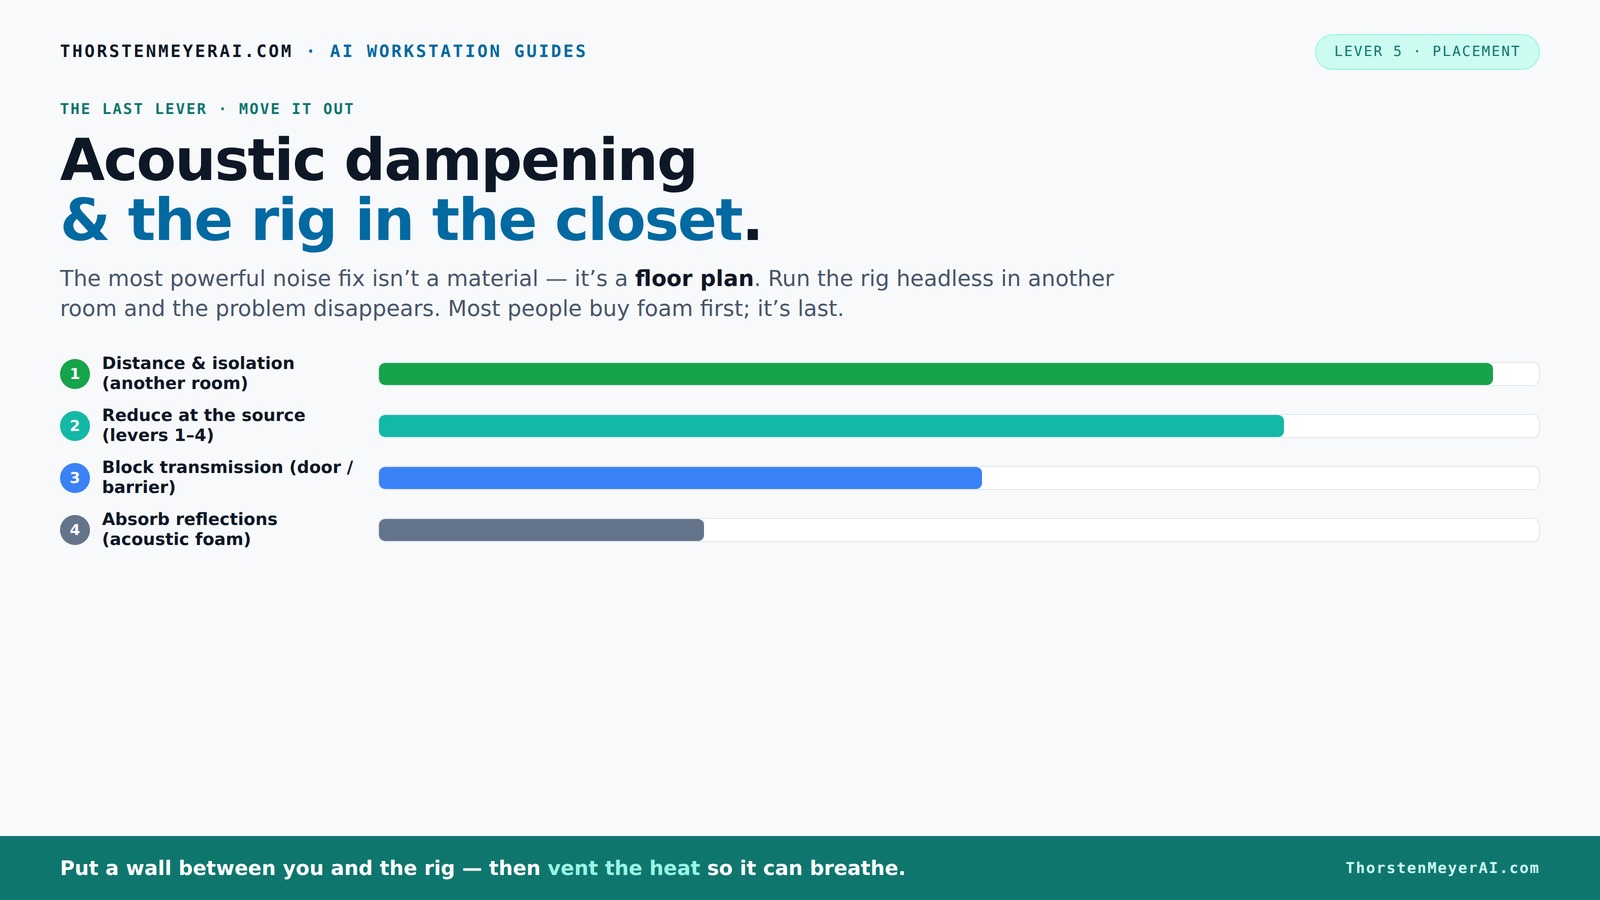
Acoustic dampening
& the rig in the closet.
The most powerful noise fix isn’t a material — it’s a floor plan. A rig you can’t hear because it’s in another room beats any amount of foam. Tap the approaches in Part 1 to see what actually works.
(another room)
(levers 1–4)
(door / barrier)
(acoustic foam)
Contain the noise, not the heat
Key Takeaways
- Foam only helps with reflections; it doesn't block sound transmission. Sealing gaps and adding mass matter more.
- Place your mic carefully—aim away from reflective surfaces and experiment with angles to reduce echo.
- Treat surfaces near the mic and in corners with thick absorption and bass traps for clarity and low-end control.
- Seal the door and gaps with weatherstripping or blankets—this step often beats adding foam for noise isolation.
- Moving your rig into a ventilated closet or separate room makes a bigger difference than any foam panel.
soundproofing foam panels for closet studio
As an affiliate, we earn on qualifying purchases.
As an affiliate, we earn on qualifying purchases.
Why Foam Alone Won't Turn Your Closet into a Soundproof Fortress
Foam is great for reducing high-frequency echoes inside a small space, but it can't block sound from leaking out or in. Think of foam as softening the room's reflections rather than sealing it off. For true soundproofing, you need mass, sealing gaps, and barriers.
In tiny closets, foam helps with the 'boxiness,' but if your goal is noise isolation, focus on sealing cracks, adding mass with drywall, or using dense materials. According to soundproofing experts, foam deadens echo but doesn’t stop sound transmission—big difference.
Understanding this distinction is crucial: if you expect foam to fully contain your sound, you'll be disappointed. Instead, see foam as part of a layered approach—use it to improve the room's acoustics, but rely on sealing and mass for isolation. The tradeoff is that adding mass and sealing can be more complex and expensive but are necessary for real noise reduction.
acoustic treatment bass traps
As an affiliate, we earn on qualifying purchases.
As an affiliate, we earn on qualifying purchases.
Best Mic Placement Strategies in a Tiny Closet
The key to a clean sound in a small closet is where you position the mic. Place it away from reflective walls and avoid pointing it straight at hard surfaces. Instead, angle it slightly and aim toward a soft, treated surface to minimize reflections.
For example, hang the mic a few inches in front of a foam panel, not flush against the wall. Keep it off the desk, and avoid placing it near reflective objects like shelves or monitors.
Test different angles, and remember: the reflection point is often the wall behind the mic. Positioning the mic correctly can reduce echo and make your voice sound clearer—no fancy gear needed.
Why does this matter? Because the proximity and angle of your mic influence how much room sound gets captured. The closer and more directly your mic is to your source, the less room reflection it picks up. Experimentation is key—small adjustments can dramatically improve clarity. The tradeoff is that too close can cause proximity effect—boosting bass unnaturally—so find a balance that captures your tone naturally.
microphone isolation shield
As an affiliate, we earn on qualifying purchases.
As an affiliate, we earn on qualifying purchases.
How to Treat Surfaces for Better Sound in a Closet Studio
In a tiny space, every surface matters. Focus on covering the walls behind the mic, the ceiling, and any hard surfaces that reflect sound. Think of the closet as a small concert hall—more absorption equals better clarity.
Use thick blankets, acoustic panels, or fiberglass insulation on walls and ceiling. For corners, bass traps catch the low-end rumble that can turn muddy. A simple trick: hang blankets with a few inches of air gap from the wall—this improves absorption by preventing sound from bouncing directly back.
Remember, a cluttered closet with hard, reflective surfaces can cause a boxy, boomy sound. Cover those surfaces for a tighter, clearer tone.
Deep understanding here involves recognizing that surface treatment isn't just about absorbing sound—it also influences the room's overall frequency response. Over-treating certain areas can deaden the sound too much, reducing liveliness. The key is balance: absorb enough to control reflections without making the space sound overly dull. The tradeoff is that more treatment can take up space and cost more, so prioritize the most reflective surfaces first.
studio monitor isolation pads
As an affiliate, we earn on qualifying purchases.
As an affiliate, we earn on qualifying purchases.
Sealing Gaps and the Door: Your Hidden Sound Leaks
Sound escapes through cracks, gaps, and the door itself. Sealing these is often more important than adding foam. Use weatherstripping around the door frame and consider a dense curtain or blanket over the door opening.
For example, a simple DIY fix is attaching a thick blanket with Velcro around the door to block sound leaks effectively. Also, seal around outlets and vents with acoustic sealant or foam gaskets to prevent noise from sneaking out.
This step is crucial if you want to keep your recordings clean or prevent noise from disturbing neighbors.
Understanding the tradeoff here is important: sealing gaps can sometimes make the space feel more enclosed or claustrophobic, but it significantly improves sound isolation. The more gaps you seal, the less noise leaks out, and the less external noise intrudes. The challenge is balancing effective sealing with ventilation needs to prevent heat buildup.
Using Placement and Surface Treatment to Fight Low-End Mud
Low frequencies tend to pile up in corners and close spaces. If your closet has parallel walls or a lot of hard surfaces, bass can become boomy and indistinct.
Adding bass traps in corners or using thick panels along the walls helps tame this problem. For instance, a simple DIY bass trap can be made from rockwool or fiberglass, placed at the corners behind your desk or mic.
This reduces the 'muddy' sound and gives your recordings more punch and clarity, especially for voice-over work or singing.
Understanding why low-end buildup occurs is key: sound waves at low frequencies have long wavelengths, so they tend to reflect and resonate in confined spaces. Without proper treatment, these frequencies can dominate your mix, making it sound muddy and unbalanced. The tradeoff is that bass traps are often bulky and may require placement in corners or specific spots, which can limit your setup flexibility. Proper placement and understanding of room modes are essential for effective low-frequency control.
Why Your Rig in the Closet Can Be Quieter Than You Think
Moving your noisy rig into a closet or cabinet can drastically reduce sound leakage. When you isolate the machine, the noise stays contained. But there's a catch—heat buildup.
If your PC or GPU runs hot in a sealed space, it will throttle performance or even overheat. The trick is to provide proper ventilation—active exhaust fans, ducted airflow, or even a small vent can keep things cool.
For example, installing a quiet exhaust fan that kicks in only when the temperature rises keeps your rig cool without sacrificing silence. This way, you turn a noisy closet into a silent, efficient workspace.
Understanding the balance between sound isolation and heat dissipation is vital. A sealed space traps heat, which can damage your equipment and reduce lifespan. The tradeoff is that adding ventilation might introduce noise if not carefully managed, so choosing quiet fans and strategic placement is key. Properly ventilated, your rig can be both quiet and safe, making the closet a practical solution for noise-sensitive recording.
Frequently Asked Questions
Is foam enough to turn a closet into a good recording space?
Foam helps with high-frequency reflections but doesn't block sound transmission. For a real improvement, combine foam with sealing gaps and adding mass to walls or doors.Where should I place the mic in my closet studio?
Position the mic a few inches away from walls, aiming slightly off-axis from reflective surfaces. Experiment with angles and distance until you find a clear, echo-free sound.Do I need bass traps in a small closet?
Yes, especially if you notice muddy low-end or boomy sounds. Corner bass traps or thick panels help control low frequencies and tighten your recordings.How do I stop sound from leaking through the door?
Seal gaps with weatherstripping, hang blankets or heavy curtains, and consider a door draft stopper. These DIY fixes often outperform foam panels for noise isolation.How much treatment do I need for a tiny closet?
Cover all reflective surfaces—walls, ceiling, and even the door—with thick blankets or panels. The more absorption you add, the better your sound clarity and control.Conclusion
Your closet can be a surprisingly effective studio—if you treat it like a small, controlled acoustic space. Prioritize placement, surface treatment, and sealing over just adding foam or soundproofing. Think of it as sculpting a tiny concert hall from a cramped closet.
Remember, the best soundproofing isn’t about silence alone — it’s about controlling reflections, managing low frequencies, and moving noise away from your ears. The quietest rig is often the one you hide in another room, not the one you try to tame on your desk.